Calculating Rayleigh Reflectance using Py6S
A user of Py6S recently contacted me to ask if it was possible to get an output of Rayleigh reflectance from Py6S. Unfortunately this email wasn’t sent to the Py6s Google Group, so I thought I’d write a blog post explaining how to do this, and showing a few outputs (reminder: please post Py6S questions there rather than emailing me directly, then people with questions in the future can find the answers there rather than asking again).
So, first of all, what is Rayleigh reflectance? Well, it’s the reflectance (as measured at the top-of-atmosphere) that is caused by Rayleigh scattering in the atmosphere. This is the wavelength-dependent scattering of light by gas molecules in the atmosphere – and it is an inescapable effect of light passing through the atmosphere.
So, on to how to calculate it in Py6S. Unfortunately the underlying 6S model doesn’t provide Rayleigh reflectance as an output, so we have to do a bit more work to calculate it.
First, let’s import Py6S and set up a few basic parameters:
from Py6S import *

s = SixS()

# Standard altitude settings for the sensor
# and target
s.altitudes.set_sensor_satellite_level()
s.altitudes.set_target_sea_level()

# Wavelength of 0.5nm
s.wavelength = Wavelength(0.5)
Now, to calculate the reflectance which is entirely due to Rayleigh scattering we need to ‘turn off’ everything else that is going on that could contribute to the reflectance. First, we ‘turn off’ the ground reflectance by setting it to zero, so we won’t have any contribution from the ground reflectance:
s.ground_reflectance = GroundReflectance.HomogeneousLambertian(0)Then we turn off aerosol scattering:
s.aero_profile = AeroProfile.PredefinedType(AeroProfile.NoAerosols)and also atmospheric absorption by gases:
s.atmos_profile = AtmosProfile.PredefinedType(AtmosProfile.NoGaseousAbsorption)We can then run the simulation (using s.run()) and look at the outputs. The best way to do this is to just run:
print(s.outputs.fulltext)to look at the ‘pretty’ text output that Py6S provides. The value we want is the ‘apparent reflectance’ – which is the reflectance at the top-of-atmosphere. Because we’ve turned off everything else, this will be purely caused by the Rayleigh reflectance.
We can access this value programmatically as s.outputs.apparent_reflectance.
So, that’s how to get the Rayleigh reflectance – but there are a few more interesting things to say…
Firstly, we don’t actually have to set the ground reflectance to zero. If we set the ground reflectance to something else – for example:
s.ground_reflectance = GroundReflectance.HomogeneousLambertian(GroundReflectance.GreenVegetation)and run the simulation, then we will get a different answer for the apparent radiance – because the ground reflectance is now being taken into account – but we will see the value we want as the atmospheric intrinsic reflectance. This is the reflectance that comes directly from the atmosphere (in this case just from Rayleigh scattering, but in normal situations this would include aerosol scattering as well). This can be accessed programmatically as s.outputs.atmospheric_intrinsic_reflectance.
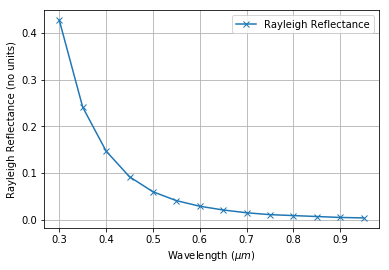
One more thing, just to show that Rayleigh reflectance in Py6S behaves in the manner that we’d expect from what we know of the physics… We can put together a bit of code that will extract the Rayleigh reflectance at various wavelengths and plot a graph – we’d expect an exponentially-decreasing curve, showing high Rayleigh reflectance at low wavelengths, and vice versa.
The code below will do this:
from Py6S import *
import numpy as np
import pandas as pd
import matplotlib.pyplot as plt
%matplotlib inline

s = SixS()

s.altitudes.set_sensor_satellite_level()
s.altitudes.set_target_sea_level()
s.aero_profile = AeroProfile.PredefinedType(AeroProfile.NoAerosols)
s.atmos_profile = AtmosProfile.PredefinedType(AtmosProfile.NoGaseousAbsorption)

wavelengths = np.arange(0.3, 1.0, 0.05)
results = []

for wv in wavelengths:
    s.wavelength = Wavelength(wv)
    s.run()

    results.append({'wavelength': wv,
                   'rayleigh_refl': s.outputs.atmospheric_intrinsic_reflectance})

results = pd.DataFrame(results)

results.plot(x='wavelength', y='rayleigh_refl', style='x-', label='Rayleigh Reflectance', grid=True)
plt.xlabel('Wavelength ($\mu m$)')
plt.ylabel('Rayleigh Reflectance (no units)')
This produces the following graph, which shows exactly what the physics predicts:
There’s nothing particularly revolutionary in that chunk of code – we’ve just combined the code I demonstrated earlier, and then looped through various wavelengths and run the model for each wavelength.
The way that we’re storing the results from the model deserves a brief explanation, as this is a pattern I use a lot. Each time the model is run, a new dict is appended to a list – and this dict has entries for the various parameters we’re interested in (in this case just wavelength) and the various results we’re interested in (in this case just Rayleigh reflectance). After we’ve finished the loop we can simply pass this list of dicts to pd.DataFrame() and get a nice pandas DataFrame back – ready to display, plot or analyse further.
If you found this post useful, please consider buying me a coffee.
This post originally appeared on Robin's Blog.
Categorised as: Academic, Programming, Py6S, Python, Remote Sensing
Hello Robin and thanks for the great post!
I have a question, isn’t it necessary to provide longitude and latitude for the area of interest, as well as, the date and time of research interest?
In what context?
The Rayleigh reflectance will vary based on view angles and solar angles. You can either set this manually with s.geometry = Geometry.User() and then set s.geometry.solar_z, solar_a etc. Or you can do this semi-automatically by using Geometry.User.from_time_and_location(), which will set the solar angles automatically from a location and time, and allow you to set the view angles manually.
Hi Robin, great little walk-through. Much appreciated. One question: How would I implement a correction for atmospheric pressure in Py6S? Is it done through a more careful specification of AeroProfile or AtmosProfile? Or a simple multiplication by (pressure/standard pressure)?
Hi – it’s actually configured as part of setting the altitudes. You can either set an altitude in terms of height, or in terms of pressure – see https://py6s.readthedocs.io/en/latest/params.html#Py6S.Altitudes.set_target_pressure, and feel free to ask if you have any further questions.
ExecutionError: 6S executable not found.
File “/Users/opt/anaconda3/lib/python3.8/site-packages/Py6S/sixs.py”, line 322, in run
raise ExecutionError(“6S executable not found.”)
Please tell how can I correct this error?
Hi – it’s best to ask support questions on the Py6S Google Group (https://groups.google.com/g/py6s). If you post there I can try and help you some more. It sounds like the 6S executable isn’t installed properly – did you follow the installation instructions and install via conda?
I tried to run a simple test to ensure that Py6S has found the correct executable for 6S using SixS.Test(), but this is what I get using the windows 10 command prompt:
>>> SixS.Test()
Traceback (most recent call last):
File “”, line 1, in
NameError: name ‘SixS’ is not defined