Creating an email service for my son’s childhood memories with Python
For a number of years – since my now-toddler son was a small baby – I’ve been keeping track of various childhood achievements or memories. When I first came up with this I was rather sleep-deprived, and couldn’t decide what the best way to store this information would be – so I went with a very simple option. I just created a Word document with a table in it with two columns: the date, and the activity/achievement/memory. For example:
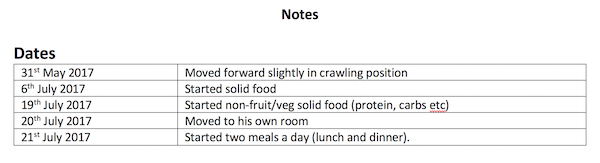
This was very flexible as it allowed me to keep anything else I wanted in this document – and it was portable (to anyone who have access to some way of reading Word documents) – and accessible to non-technical people such as my son’s grandparents.
After a while though, I wondered if I’d made the right decision: shouldn’t I have put it into some other format that could be accessed programmatically? After all, if I kept doing this for his entire childhood then I’d have a lot of interesting data in there…
Well, it turns out that a Word table isn’t too awful a format to store this sort of data in – and you can access it fairly easily from Python.
Once I realised this, I worked out what I wanted to create: a service that would email me every morning listing the things I’d put as diary entries for that day in previous years. I was modelling this very much on the Timehop app that does a similar thing with photographs, tweets and so on, so I called it julian_timehop.
If you just want to go to the code then have a look at the github repo – otherwise, read on to find out how I did it.
Steps
Let’s start by thinking about what the main steps we need to take are:
-
First we need to get hold of the document. I update it fairly regularly, and it lives on my laptop – whereas this script would need to run on my Linux server, so it can easily run at the same time each day. The easiest way around this was to store the document in Dropbox and use the Dropbox API to grab a copy when we run the script.
-
We then need to parse the document to extract the table of diary entries.
-
Once we’ve got the table, we can subset it to the rows that match today’s date (ignoring the year)
-
We then need to prepare the text of an email based on these rows, and then send the email
Let’s look at each of these in turn now.
Getting the file from Dropbox
We want to do pretty-much the simplest operation possible using the Dropbox API: login and retrieve the latest version of a file. I’ve used the Dropbox API from Python before (see my post about analysing my thesis-writing timeline with Dropbox) and it’s pretty easy. In fact, you can accomplish this task with just four lines of code.
First, we need to connect to Dropbox and authenticate. To do this, we’ll use a Dropbox API key (see here for instructions on how to get one). We don’t want to include this API key directly in the code – as we could accidentally share it with someone else (for example, by uploading the code to Github) – so we store in an environment variable called DROPBOX_KEY.
We can get the key from this environment variable with
dropbox_key = os.environ.get('DROPBOX_KEY')We can then create a Dropbox API connection and authenticate
dbx = dropbox.Dropbox(dropbox_key)To download a file, we just call the files_download_to_file method
dbx.files_download_to_file(output_filename, path)In this case the path argument is the path of the file inside the Dropbox folder – in my case the path is /Notes and diary entries for Julian.docx as the file is in the root Dropbox folder.
Putting this together we get a function to download a file from Dropbox
def download_file(path):
    """
    Download a file from Dropbox, returning the local filename of the downloaded file

    Requires the DROPBOX_KEY env var to be set to a valid Dropbox API key
    """
    dropbox_key = os.environ.get('DROPBOX_KEY')
    dbx = dropbox.Dropbox(dropbox_key)
    output_filename = 'document.docx'
    dbx.files_download_to_file(output_filename, path)

    return output_filename
That’s the first step completed; next we need to extract the table from the Word document.
Extracting the table
In a previous job I did some work which involved automating the creation of Powerpoint presentations, and I used the excellent python-pptx library for reading and writing Powerpoint files. Conveniently, there is a sister library available for Word documents called python-docx which works in a very similar way.
We’re going to convert the Word table to a pandas DataFrame, so after installing python-docx we need to import the main Document class, along with pandas itself
from docx import Document
import pandas as pd
We can parse the document by creating an instance of the Document class with the filename as a parameter
doc = Document(filename)The doc object has various useful methods and attributes – and one of these is a list of tables in the document. We know that we want to parse the first table – so we just select the 0th index
tab = doc.tables[0]To create a pandas DataFrame, we need a list containing the contents of each column: here that means a list of dates and a list of entries.
tab.column_cells(0) gives us an iterator over all the cells in column 0, and each cell has a .text method to give the text content of that cell – so we can write a list comprehension to extract all of the contents into a list
dates = [cell.text for cell in tab.column_cells(0)]We can then use the very handy pd.to_datetime function to convert these to actual date objects. We pass the argument errors='coerce' to force it to parse all entries in the list, without giving errors if one of them isn’t a valid date (in this case it will return NaT or Not a Time).
We can do the same for descriptions, and then put the descriptions and dates together into a DataFrame.
Here is the full code:
def read_table_from_doc(filename):
    doc = Document(filename)
    tab = doc.tables[0]

    dates = [cell.text for cell in tab.column_cells(0)]
    dates = pd.to_datetime(dates, errors='coerce')

    descs = [cell.text for cell in tab.column_cells(1)]

    df = pd.DataFrame({'desc':descs}, index=dates)

    return df
Creating the text for an email
The next step is to create the text to put in an email message, listing the date and the various memories. I wanted an output that looked like this:
01 December
2018:
Memory from 2018
2018:
Another memory from 2018
2017:
A memory from 2017
The code for this is fairly simple, and I’ll only mention the interesting bits.
Firstly, we create a subset of the DataFrame, where we only have the rows where the date was the same as today’s date (ignoring the year):
today = datetime.datetime.now()
subdf = df[(df.index.month == today.month) & (df.index.day == today.day)]
Here we’re combining two boolean indexing operations with & – though do remember to use brackets, as the order of precedence inside these boolean expressions doesn’t always work in the way you’d expect (I’ve been caught out by this a number of times).
As I knew this would only be running on my server, I could use new Python 3.7 features – so I used f-strings. This means that the body of my loop to create the HTML for the email body looks like this
text += f"<p><b>{i.year!s}:</b></br>{row['desc']}</p>\n\n"Here we’re including variables such as i.year (the year value of the datetime index) and row['desc'] (the value of the desc column of this row).
Putting it together into a function gives the following code, which either returns the HTML text of the email or None if there are no events matching this date
def get_formatted_message(df):
    today = datetime.datetime.now()

    subdf = df[(df.index.month == today.month) & (df.index.day == today.day)]

    if len(subdf) == 0:
        return

    title_date = datetime.datetime.now().strftime('%d %B')
    text = f'<h2>{title_date}</h2>\n\n'
    for i, row in subdf.iterrows():
        text += f"<p><b>{i.year!s}:</b></br>{row['desc']}</p>\n\n"

    return text
Sending the email
I’ve written code to send emails in Python before, and had great difficulty. Emails are a lot more difficult than a lot of people think, and often my emails never got sent, or never got to their destination, or broke in some other way.
This time I managed to avoid all of those problems by using the emails library. Writing a send_email function using this library was so easy:
def send_email(text):
    message = emails.html(html=text,
                          subject='Julian Timehop',
                          mail_from=('Julian Timehop Emailer', 'robin@rtwilson.com'))

    password = os.environ.get('SMTP_PASSWORD')

    r = message.send(to=('R Wilson', 'robin@rtwilson.com'),
                     smtp={'host':'mail.rtwilson.com',
                           'port': 465, 'ssl': True,
                           'user': 'robin@rtwilson.com', 'password': password})
All of the code above is self-explanatory: we’re creating a HTML email message (it details with all of the escaping and encoding necessary), grabbing the password from another environment variable and then sending the email. Easy!
Putting it all together
We’ve now written a function for each individual step – and now we just need to put the functions together. The benefit of writing your script this way is that the main part of your script is just a few lines.
In this case, all we need is
filename = download_file('/Notes and diary entries for Julian.docx')
df = read_table_from_doc(filename)
text = get_formatted_message(df)
if text is not None:
    send_email(text)
Another benefit of this is that for anyone (including yourself) coming back to it in the future, it is very easy to get an overview of what the script does, before delving into the details.
So, I now have this set up on my server to send me an email every morning with some memories of my son’s childhood. Here’s to many more happy memories – and remember to check out the code if you’re interested.
I do freelance work on Python programming and data science – please see my freelance website for more details.
If you found this post useful, please consider buying me a coffee.
This post originally appeared on Robin's Blog.
Categorised as: Python
Leave a Reply