How to: Log electricity usage from a CurrentCost EnviR – Part 1
After borrowing a CurrentCost electricity usage meter from my local library (if you’re in the area, then Eastleigh library will loan you one for free!), I decided to buy one, as I’d found it very useful in trying to reduce my electricity usage. The benefit of buying one as opposed to borrowing one was that I could start connecting it to a computer and logging data (the one I borrowed didn’t come with a connection cable).
So, I bought a CurrentCost EnviR meter on eBay for around £15:

I was impressed with how easy it was to get data from it to the computer. All I did was:
-
Plug it in to a USB port on my Linux server with the cable (which was provided, but can also be bought separately if necessary – or even made yourself)
-
Check what serial device the USB-to-serial adaptor (which is built-in to the cable) is coming up as by running
dmesgand checking the final lines of the output. A similar command should work on OS X, and on Windows you should be able to check Device Manager and see what COM port number it has been assigned. In my case, it was/dev/ttyUSB0. -
Test it using a serial communication program. For example, on Linux I ran
sudo minicom -D /dev/ttyUSB0 -b 57600(the last argument is essential as it sets the baud rate correctly for the device). On Windows something like Hyperterminal could be used.
You should find that you get a nice XML string back – something like this:
<msg><src>CC128-v1.48</src><dsb>00008</dsb>
<time>21:36:48</time><tmpr>23.8</tmpr>
<sensor>0</sensor><id>00077</id><type>1</type>
<ch1><watts>00419</watts></ch1></msg>
That’s fairly self-explanatory, but just for reference:
src: the model number of the CurrentCostdsb: days since birth (how long since you turned on the CurrentCost and it started collecting data)time: self-explanatorytmpr: temperature (degrees C)ch1: you can have multiple sensors attached to the CurrentCost, so this tells you which one it iswatts: current power usage in Watts
I’ve written the Python code below to read the XML over the serial connection, parse the data and return it. You’ll need to install pyserial and untangle (a handy XML parsing library for simple, small bits of XML) first using pip.
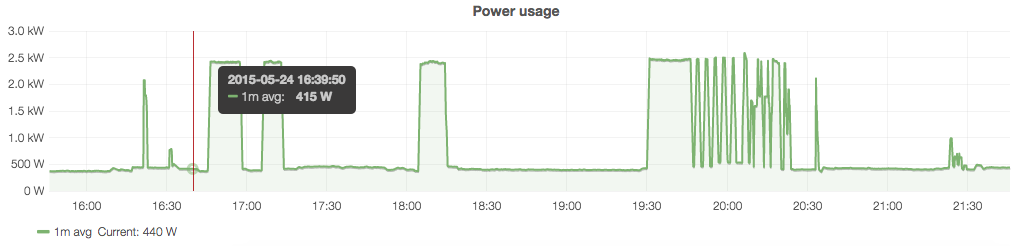
In the next part of this series, I’ll show how I linked this data up to Graphite to make lovely plots. As a quick taster, here is my current ‘dashboard’ (click for a larger view):
If you found this post useful, please consider buying me a coffee.
This post originally appeared on Robin's Blog.
Categorised as: Computing, Home Automation, How To, Linux, OSX, Programming, Python, Windows
Hi Robin,
Looking how to connect my EnvirR to my FreeNAS server just found your blog and I really love how simple you made it.
I plan to set up a jail to host the collector, the database and even a small web server to show graphs and so, just like I did with my meteo station.
I really really hate the current cost web service, it’s too much simple and for free I can only see the main channel. I have 5, and I believe that no way can be that expensive for them to show five channel data as they pretend to charge, so the way to go is my little freenas box.
Keep on with the rest of the article, let’s set up a nice server where we don’t depend of third parties.
Regards, Angel
Really glad you like the article – thanks for the comment! The next part should be coming early next week. 🙂
[…] the end of my last post I left you with a taster of what Part 2 would provide: a way of producing automatically-updating […]
Just for you to know, as I’m no python expert, after looking all around the web yours is the only example using untangle, which I find amazingly easy to understand and modify to fit my needs. Right now I’m trying to use your code to feed an emoncms server I’m also trying to set up (without too much luck ATM).
Regards, Angel
Looking how to connect my EnvirR to my FreeNAS server just found your blog and I really love how simple you made it.
I plan to set up a jail to host the collector, the database and even a small web server to show graphs and so, just like I did with my meteo station.
fifteen quid?! last i saw Eon and EDF were flogging them for about 4x that, and even the cables were more! blimey…
and I get the feeling that the one we were given can’t even dream about getting data from my “remote read” (IE the guy from the supplier can stand outside my door and get the reading) water meter… though it might be worth a bash trying to re-pair it and seeing if it now reports two channels! Gas meter is a pretty traditional old thing, but the only place the supply goes to is the boiler and that measures its own use, so if it was possible to get all three together and unify the data it’d be like having an all-utilities smart meter under my own control…
a lot of the links here are sort of out of date now, btw 🙁 … even in just a year.
I connected my Envi R receiver to my wifi network, using an ESP8266 and the esp-link firmware. I wrote it up here, if anyone is interested: https://plus.google.com/+RoganDawes/posts/6TXHraQJMHB
Thanks Robin. I had been looking for such a script for a long time, and yours is so simple 🙂
Note I made a small amendment to allow for multiple devices connected to the EnviR.
(also changed the return to an array as it’s easier to work with later on and send the data to my Home-Assistant.io setup)
sensor = int(p.msg.sensor.cdata)
return [sensor, watts, temperature]
I tried your pywatts.py
but…
alistair@Main:~/Electricity$ python ./pywatts.py
File “./pywatts.py”, line 19
return (watts, temperature)
SyntaxError: ‘return’ outside function
good article, thank you