Summary: The QGIS Reloader plugin will give you a new QGIS command to reload a layer, very useful when you’re updating a layer in another program and want to refresh QGIS’s view of it.
I use QGIS for almost all of my interactive GIS needs. Often I’ll be writing some code in Python that creates some sort of GIS layer (often a GeoPackage) and then I’ll use QGIS to interactively explore that layer.
In this situation, I’ll frequently create new versions of the GIS layer. Usually I’ve dealt with this by just creating XXX_v1.gpkg, XXX_v2.gpkg and so on, and dragging them into QGIS. However, if you have some complex symbology set up on the layer in QGIS you have the additional step of copying/pasting the layer styling from the old layer to the new layer. That’s a bit of a pain, but at least it’s possible.
Recently I’ve been using the QGIS Attribute Forms functionality to display an image when clicking on a feature in a layer, and those settings can’t be easily copied between layers. If I drag in a new version of the layer then I’ll have to click through and set up all of the form settings again.
What I wanted was a way to reload the contents of a layer from the file on disk – so I could just save to the same filename each time and reload the layer in QGIS. A bit of research showed me that duplicating a layer did this (right-click the layer and click Duplicate Layer) – but that leaves you with multiple layers, and an annoying ‘copy’ appended to the name.
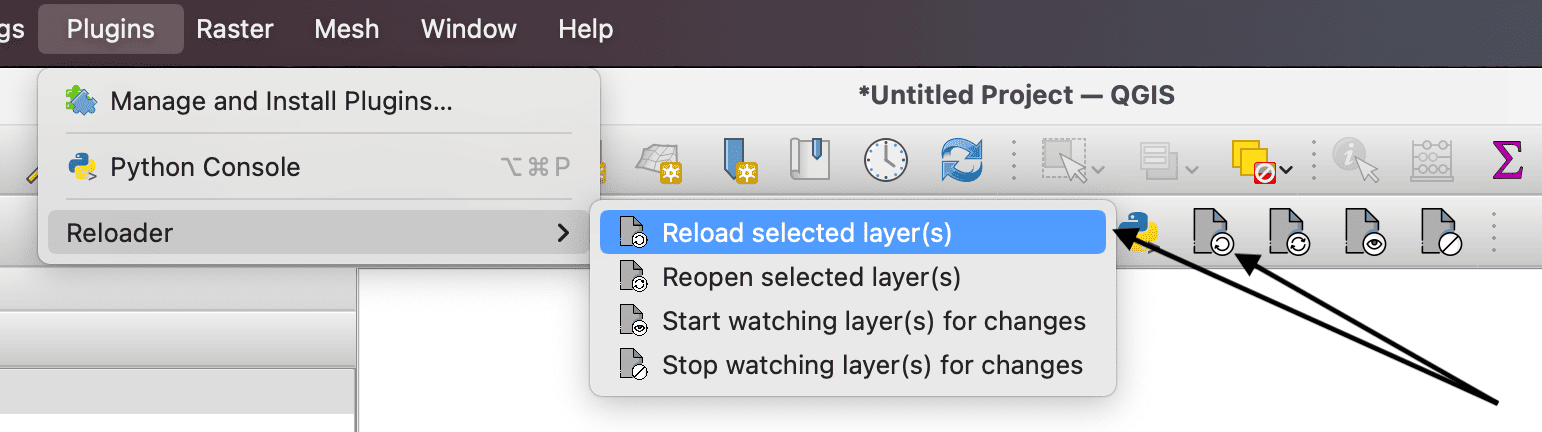
Today I found a plugin that does exactly what I need. It’s called Reloader and is available from the QGIS Plugins Repository – just search for its name. It adds some new menu entries to reload the selected layers, reopen the layers (which updates the extent too), and even start/stop watching layers for changes (with a filesystem watcher that will update the layer whenever the underlying file changes). Just what I needed!
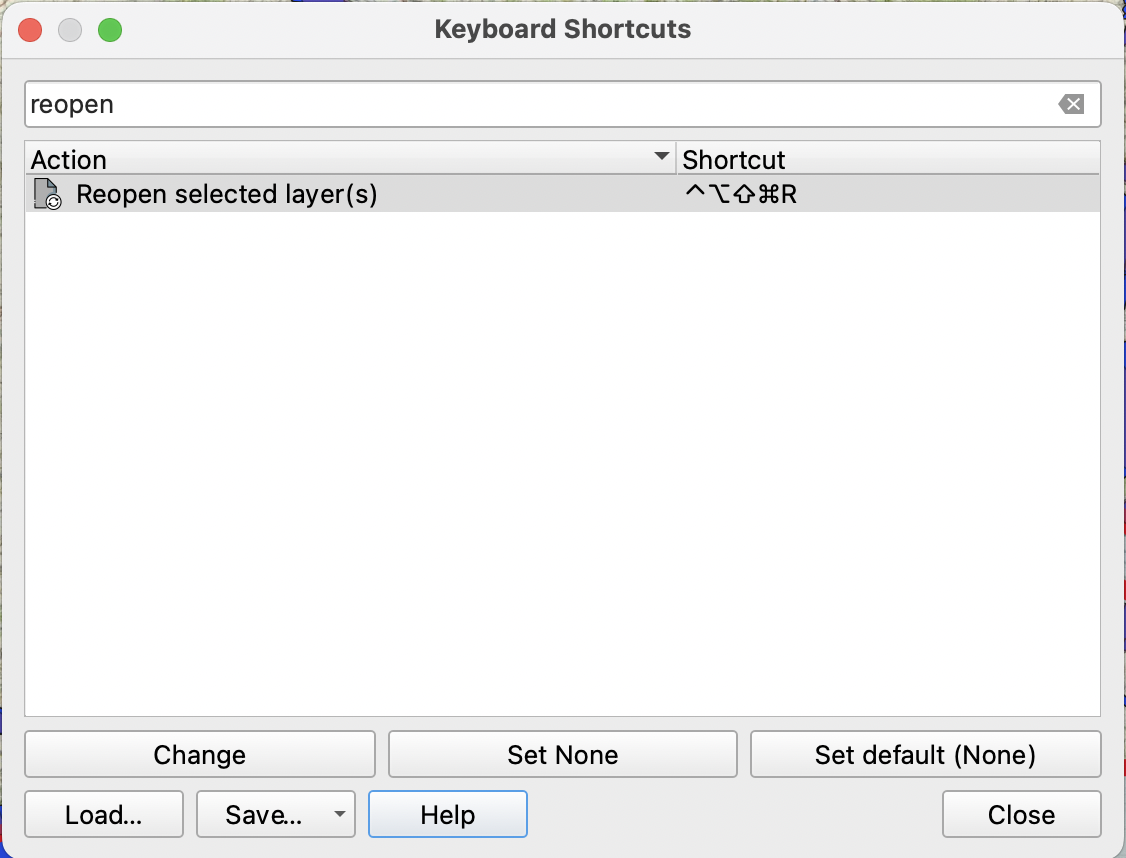
The only minor issue I have is that the menu entries come under the top-level Plugins menu, rather than in the right-click menu for an additional layer. I assume that QGIS doesn’t let plugins modify the layer context menu. However, to save going to the Plugins menu each time you can set up a keyboard shortcut for these functions. Go to Settings->Keyboard Shortcuts and search for Reload or Reopen and click the Change button to set a keyboard shortcut.
In the image above I’ve set a keyboard shortcut that looks very complex to press, but is actually easy when using my Goku configuration to get Caps Lock working as a modifier key.
Note: This blog post has been updated with a new command for creating an osx-64 environment, after I was contacted by someone from Anaconda telling me a newer, easier way to do this
I came across some conda packages that didn’t work properly on my M1 Mac (Apple Silicon – ARM processor) the other day. They installed fine, but gave segmentation faults when run. So, I wanted to run the x64 (Intel) versions of these packages instead.
I haven’t actually needed to do this since I got a M1 Mac (a testament to the quality and range of ARM conda packages available these days through conda-forge), so I wasn’t sure how to do it.
A bit of Googling and experimenting led to this nice simple set of instructions. The upshot of this is you don’t need to install another version of Anaconda/miniconda/etc – you can just create a x64 environment in your existing conda install.
In the past you used to have to prepend a CONDA_SUBDIR=osx-64 chunk to set an environment variable, but since conda 23.10.0 (released on 30th October 2023) you can use the --platform parameter instead. This tells conda to use the osx-64 packages from the package server, rather than the default osx-arm64 (M1 Mac) subdirectory. This is what gets you the x64 packages. Documentation for this option is available here, along with a list of possible platform names you can use.
When this command finishes, you will have a new x64 conda environment. You can then activate it with
conda activate environment_name
That’s it! You now have a x64 environment which you can install packages in using standard conda install commands.
Note:
The previous set of instructions here had two extra steps to deal with the CONDA_SUBDIR environment variable. I’ve included these below for anyone using an old version of conda, but these won’t be needed if you’re using the --platform parameter:
Now we need to tell conda to always use this CONDA_SUBDIR setting when using this environment, otherwise any future installs in this environment will use the default CONDA_SUBDIR and things will get very confused. We can do this by setting a conda environment config setting to tell conda to set a specific environment variable when you activate the environment. Do this by running:
conda env config vars set CONDA_SUBDIR=osx-64
The output of that command will warn you to deactivate and reactivate the environment, so do this
Just a quick one today to document the solution to a problem I ran into earlier today.
I was using Microsoft Planetary Computer to access some Landsat satellite data, and I wanted to run it through the Segment Anything model from Meta, to segment out agricultural fields from the image. I tried to do this using the segment-geospatial Python package.
Unfortunately I got an error that libgl1.so could not be found. Luckily this is documented on the segment-geospatial installation page and you just need to run:
apt update; apt install -y libgl1
But, there’s a problem: Microsoft Planetary Computer does not allow apt access from their container images. I tried every way I could think of to install this, and did a lot of googling, but couldn’t find anything.
Eventually I found the answer in this issue which somehow didn’t appear in my earlier Google searches. It seems that the libgl1 library is a dependency of OpenCV, which segment-geospatial uses interally, and you can get around this dependency by installing the opencv-python-headless package. And it was just that simple – running
pip install opencv-python-headless
completely solved the problem and let me get going running segment-geospatial.
I hope this post helps someone else with the same problem as me – and hopefully turns up better in relevant Google searches.
I’m giving two talks in the next two weeks, and wanted to publicise them here in case anyone local-ish wants to come.
Oxford Cafe Scientifique
I’ve spoken at various Cafe Scientifique meet-ups before, and now it’s the turn of the Oxford one. I’ll be giving my talk about the whole range of satellite imaging – details below. This particular cafe sci focuses has a particularly long Q&A and discussion section, so I’m looking forward to getting some real back-and-forth with the audience.
Full details here, and title and description below:
Monitoring the environment from space
Hundreds of satellites orbit the Earth every day, collecting data that is used for monitoring almost all aspects of the environment. This talk will introduce to you the world of satellite imaging, take you beyond the ‘pretty pictures’ to the scientific data behind them, and show you how the data can be applied to monitor plant growth, air pollution and more.
PyData Southampton
Before the pandemic I was part of a group trying to set up a PyData Southampton group – but unfortunately it got derailed by lockdown. Luckily, we’ve managed to resurrect it, and the first meeting will be on Tues 17th October at the Carnival offices near IKEA in Southampton. If you enjoy Python and data stuff then come along!
Full details here and title and description below:
An Introduction to geospatial data & processing
In this talk, Robin will introduce geospatial data and how to process it using Python. He’ll explain what geospatial data is, and what makes it different from normal data. He’ll cover the types of geospatial data, issues relating to co-ordinate systems, and where to get geospatial data, before diving into a couple of case studies of geospatial data processing with Python using libraries including GeoPandas, rasterio, shapely, rasterstats, folium and more.
In the spirit of my Previously Unpublicised Code series, today I’m going to share Pandas-FSDR. This is a simple library with one function which finds significant differences between two columns in a pandas DataFrame.
For example, imagine you had the following data frame:
Subject
UK
World
Biology
50
40
Geography
75
80
Computing
100
50
Maths
1500
1600
You may be interested in the differences between the values for the UK and the World (these could be test scores or something similar). Pandas-FSDR will tell you – by running one function you can get output like this:
Maths is significantly smaller for UK (1500 for UK compared to 1600 for World)
Computing is significantly larger for UK (100 for UK compared to 50 for World)
Differences are calculated in absolute and relative terms, and all thresholds can be altered by changing parameters to the function. The function will even output pre-formatted Markdown text for display in an IPython notebook, inclusion in a dashboard or similar. The output above was created by running this code:
result = FSDR(df, 'UK', 'World', rel_thresh=30, abs_thresh=75)
This is a pretty simple function, but I thought it might be worth sharing. I originally wrote it for some contract data science work I did years ago, where I was sharing the output of Jupyter Notebooks with clients directly, and wanted something that would ‘write the text’ of the comparisons for me, so it could be automatically updated when I had new data. If you don’t want it to write anything then it’ll just output a list of row indices which have significant differences.
Anyway, it’s nothing special but someone may find it useful.
GeoParquet is a cool new-ish format for geospatial data. I’ve tried to use it a couple of times, but always run into issues with my GDAL/OGR install not supporting it. Each time this has led to me giving up, as I couldn’t be bothered to install GDAL from somewhere else.
Today, I found the solution. I usually use GDAL from conda-forge, and it turns out you can install GeoParquet support for that GDAL by just installing an extra conda-forge package:
(feel free to replace conda with mamba if – like me – you’re using mamba for its speed improvements).
Once this is installed, GeoParquet works in everything that uses that GDAL library – in my case this included the GDAL/OGR command-line tools, plus various Python modules that link to GDAL.
This is actually documented at the end of the GDAL GeoParquet driver page, but I don’t think I’d ever scrolled to the bottom of that before.
A fun analysis I did a while back was using the Google Maps API to look at travel times between certain locations over time. I originally got interested in this because I found that travelling from my house to the university (yes, that’s how long ago this started…) seemed to either take a very short time, or a very long time, but rarely anything in the middle. I wondered if the histogram of travel times might be bi-modal – so I thought I’d investigate. This then led to doing various other analyses of local travel times.
It was actually very easy to gather the data for this. Google Maps will give you an estimated travel time for any route that you plan, and I’ve usually found these estimated times quite accurate – so I’ve relied on these for my data here. There is a googlemaps package for Python that wraps the Google Maps API and you can get the travel time between two locations using code like this:
Back when I did this, the Google Maps API didn’t require authentication for most uses, and had a very generous free tier. This changed after a while, and now I suspect you’d need to give an API key, and have a credit card set up on your API account, and so on.
Anyway, as you can see, this code is just one API call, and then extracting the ‘duration_in_traffic’ from the result (it comes in seconds, we convert it to minutes).
To get a dataset of travel times over time, you just need to run this regularly (using chron, or equivalent), giving a sensible set of from and to locations. These locations can be anything that Google Maps recognises: an address, a lat/lon pair, a business etc. One warning is that you must pick the from and to locations carefully if you’re starting on a dual carriageway or a motorway: if you give the starting location on the wrong carriageway (just a small change in the latitude and longitude values) then your route will be wrong as it will show you travelling down that carriage way until a junction where you can turn onto the correct carriageway.
So, lets look at some results:
Home to University histograms
Looking at my initial question, here is a histogram of travel times from my home to the university (click on any image to see a larger version):
You can see that my hypothesis was wrong: the distribution is not bimodal, but it is definitely one-sided. The peak is around 11-12 minutes, and then there is a long tail extending to the right as delays increase, with a few journeys taking almost double that time.
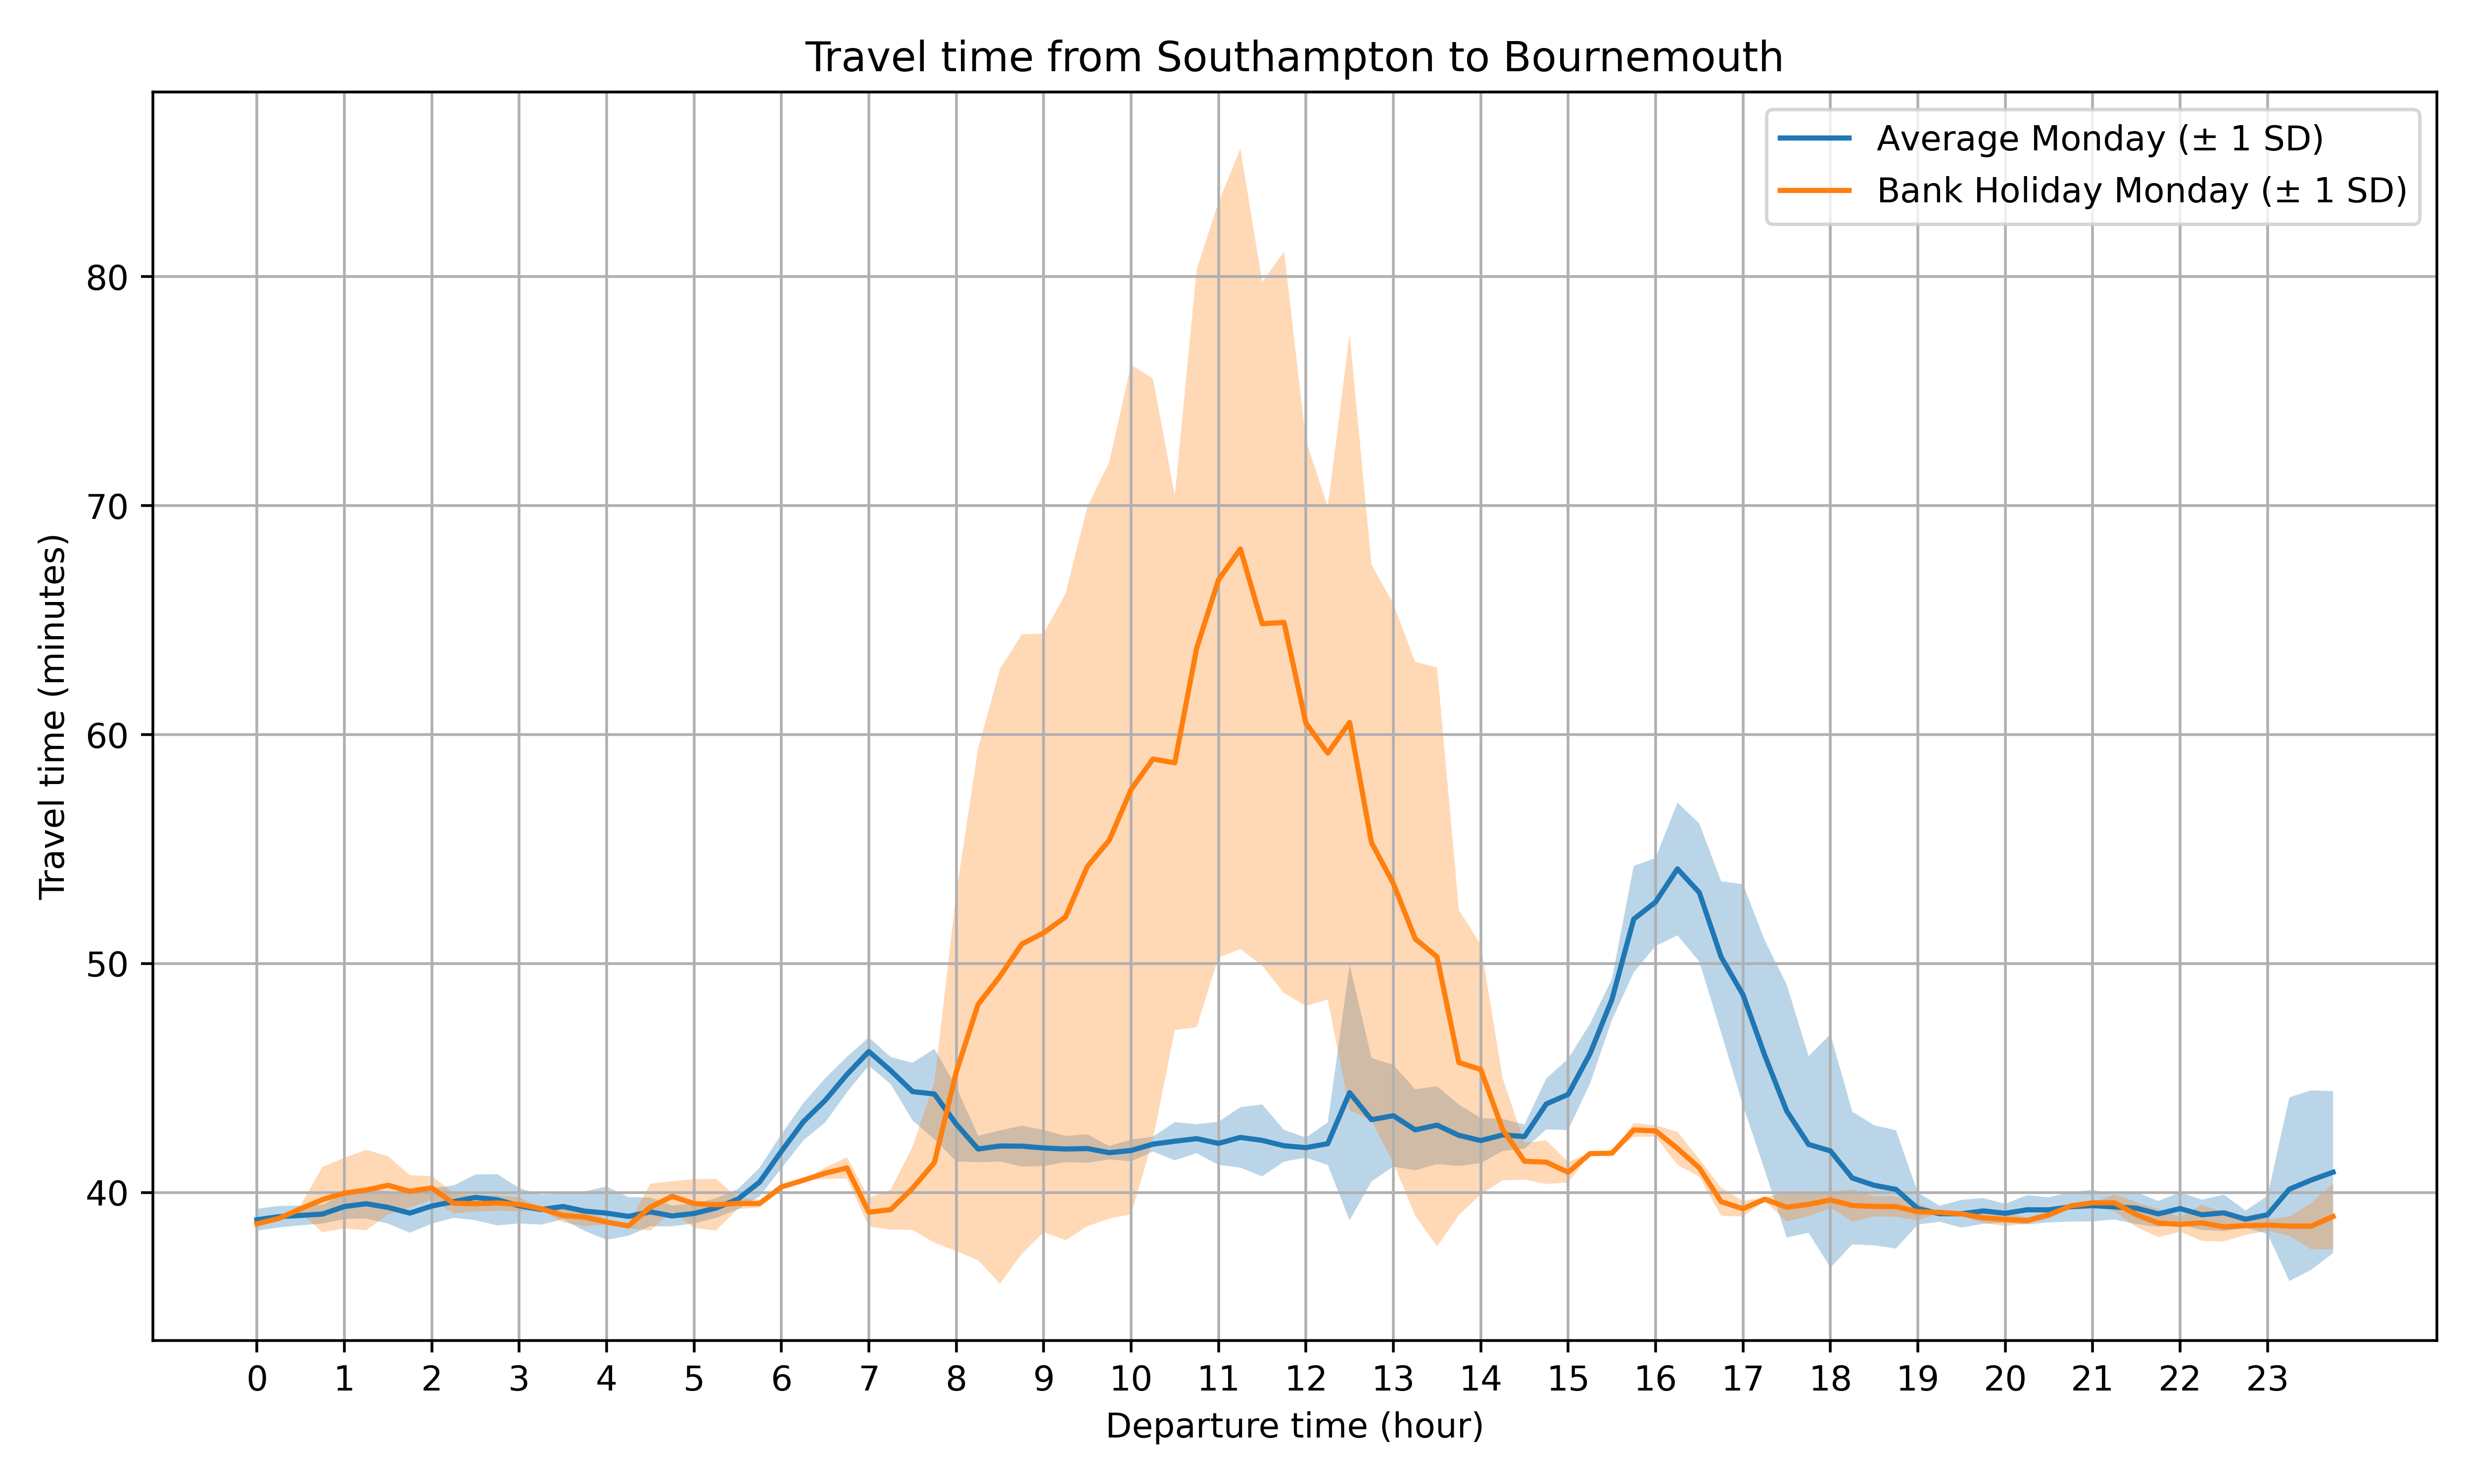
Southampton to Bournemouth
A more interesting analysis is the travel time between Southampton and Bournemouth (for those not familiar with UK geography, Southampton is a city on the south coast of the UK but without a beach, and Bournemouth has a nice beach about 45mins drive from Southampton). Again, this idea came from personal experience: I was going over to the Bournemouth area relatively frequently during the spring/summer to go to the beach, and was interested in how long it would take. It’s well-known that the traffic between Southampton and Bournemouth is particularly bad on a summer weekend, and I wondered how bad it was on bank holidays.
So, I plotted travel time between Southampton and Bournemouth on normal Mondays, compared to bank holiday Mondays:
There are a few interesting patterns in this graph: firstly, and most obviously, there is a big difference in travel times on bank holidays – travel in mid-morning can take over 50% longer than on a normal Monday. You can see the rush hour peaks on normal Mondays for journeys leaving at around 7am and 4:30pm. These peaks are still there on bank holiday Mondays, but are significantly smaller. The travel time on a bank holiday starts to exceed a normal day from around 8-9am, and reaches its peak for journeys starting from Southampton around 11am (after all, who wants to get up early on a bank holiday!).
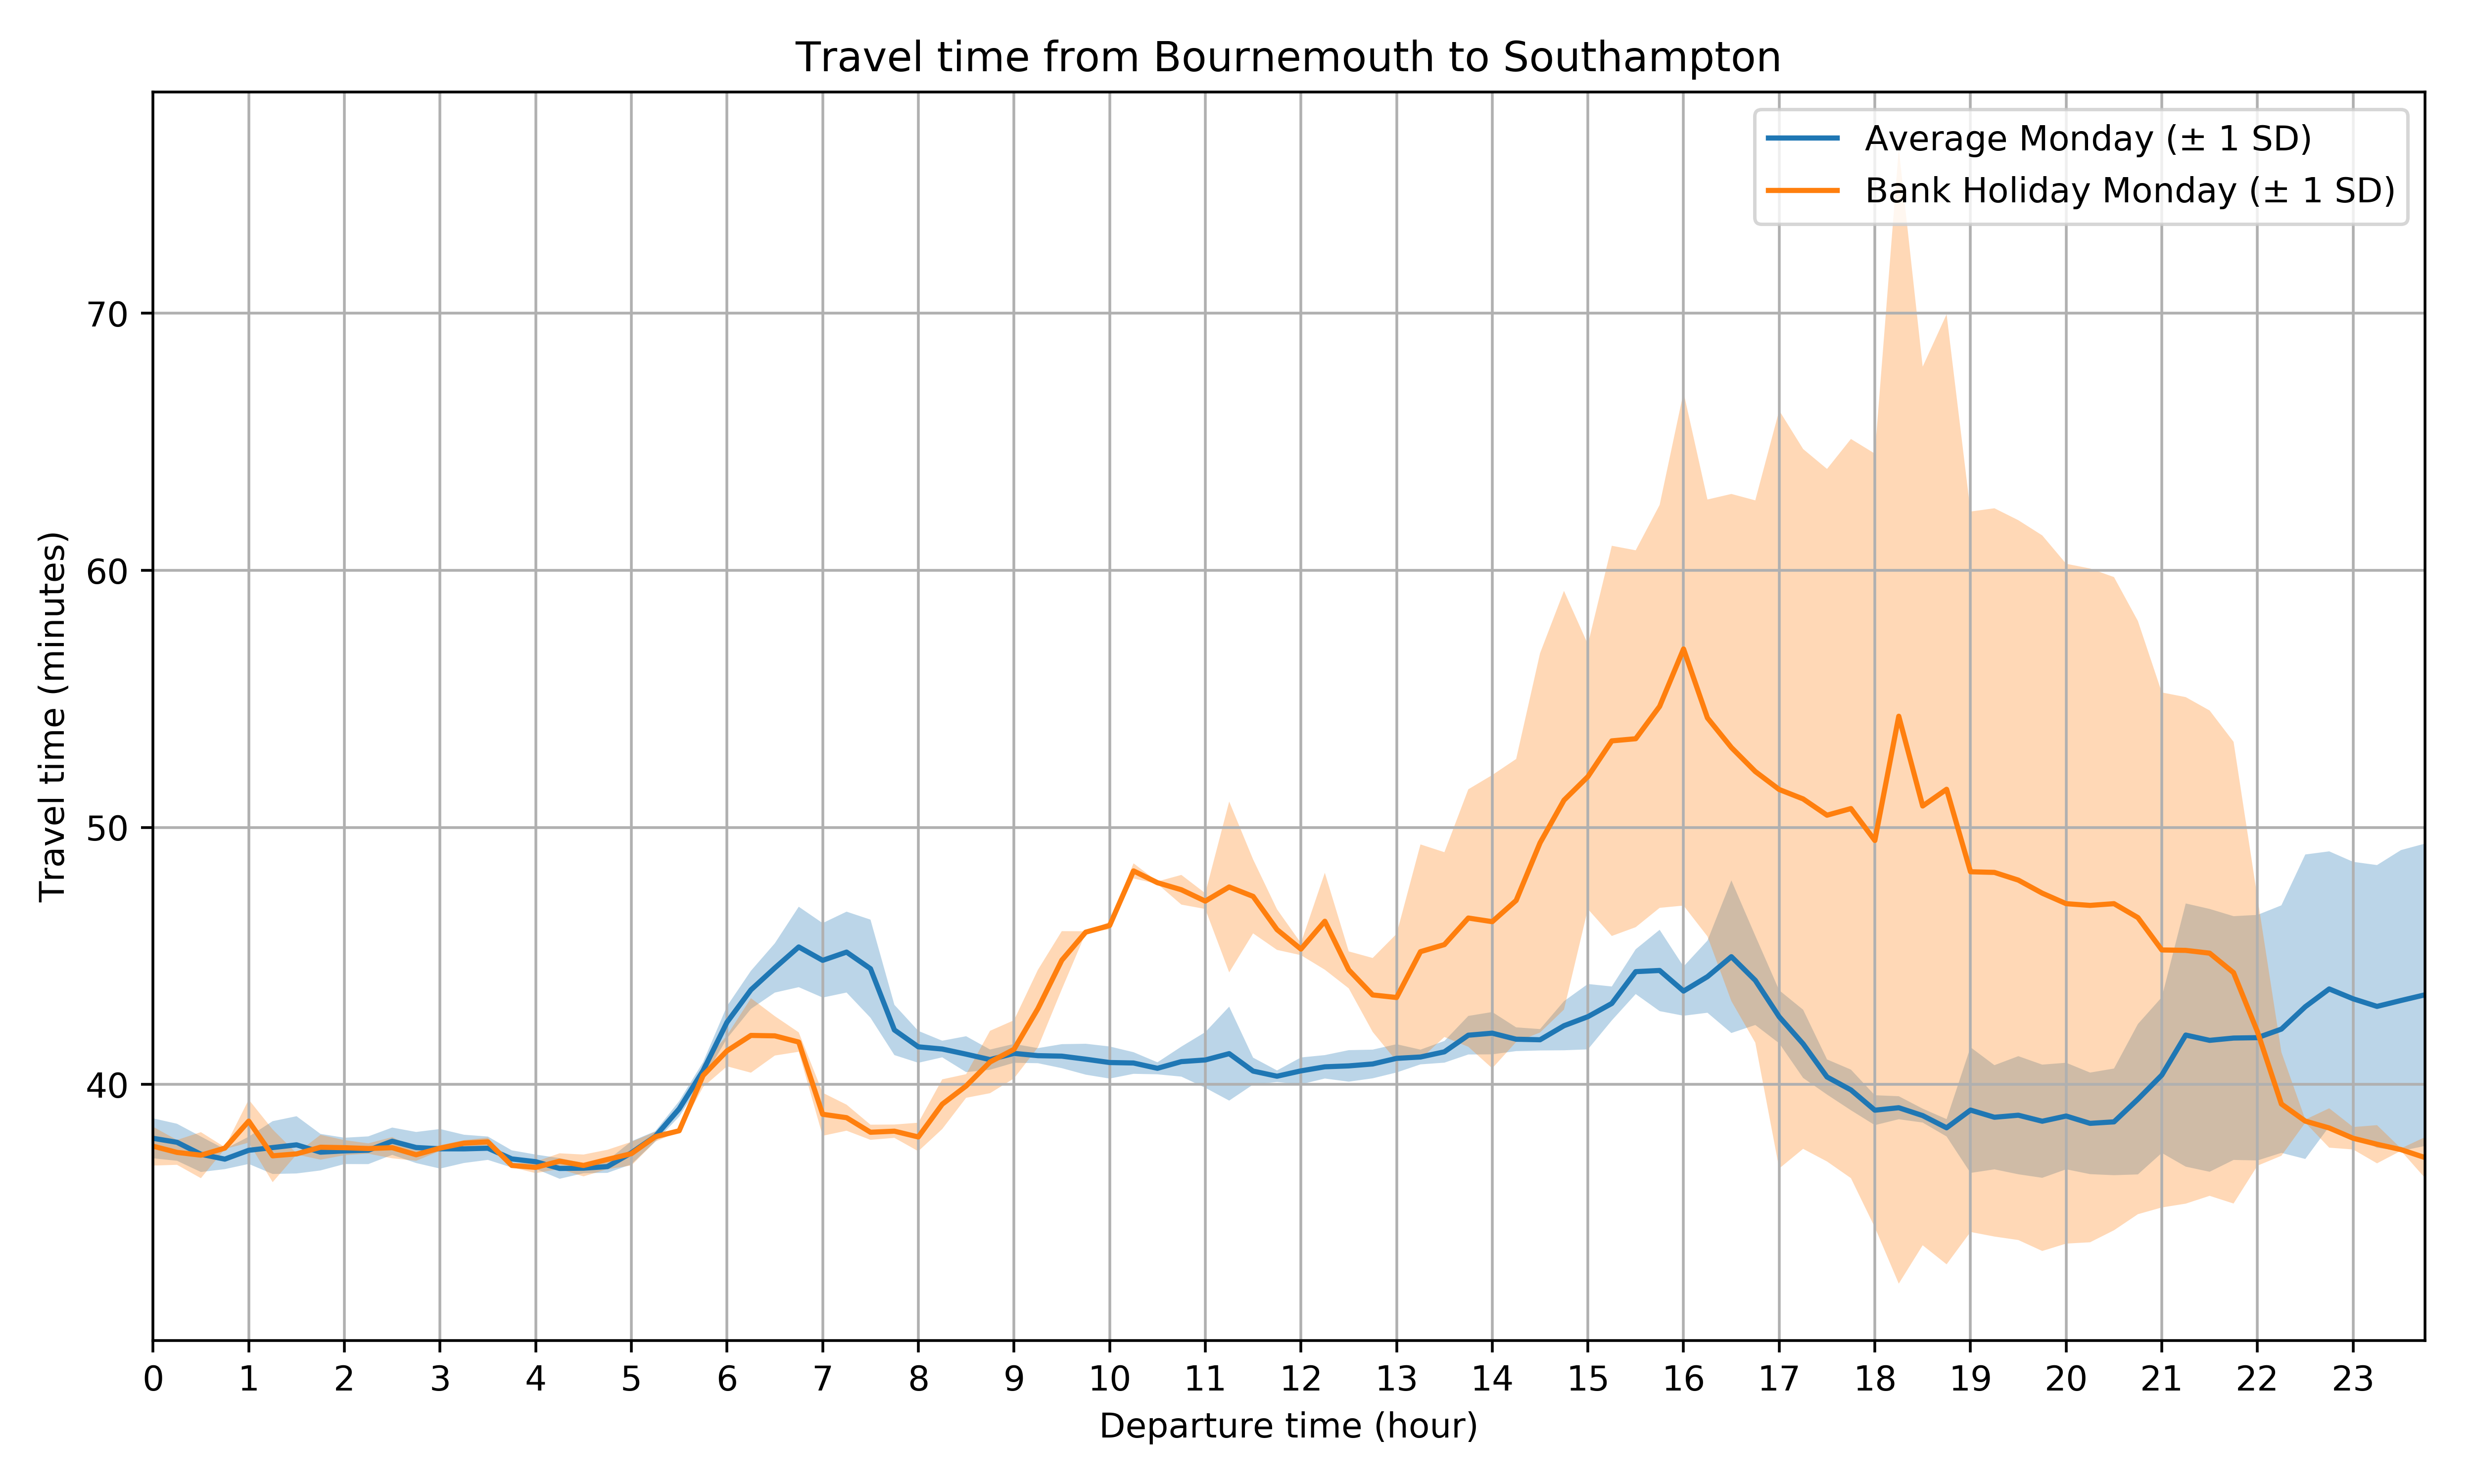
Looking at the reverse journey, from Bournemouth back to Southampton, you can see a far broader peak on bank holidays:
Again, there is a standard rush hour peak (though less well-defined) on normal Mondays at around 7am and 4-5pm, but the bank holiday peak starts around 10am (presumably for people travelling from Bournemouth for some other reason than to go directly to Southampton), and then there is a broad peak starting in the early afternoon of people travelling back to Southampton, extending right up until around 8-9pm.
So, from a practical purpose, if you’re going to the beach in Bournemouth on a bank holiday Monday, when should you leave Southampton? Traffic is probably best if you leave before 8am (a bit early for a bank holiday!) or after 3pm, and you’re likely to hit the traffic if you come home any time after lunch.
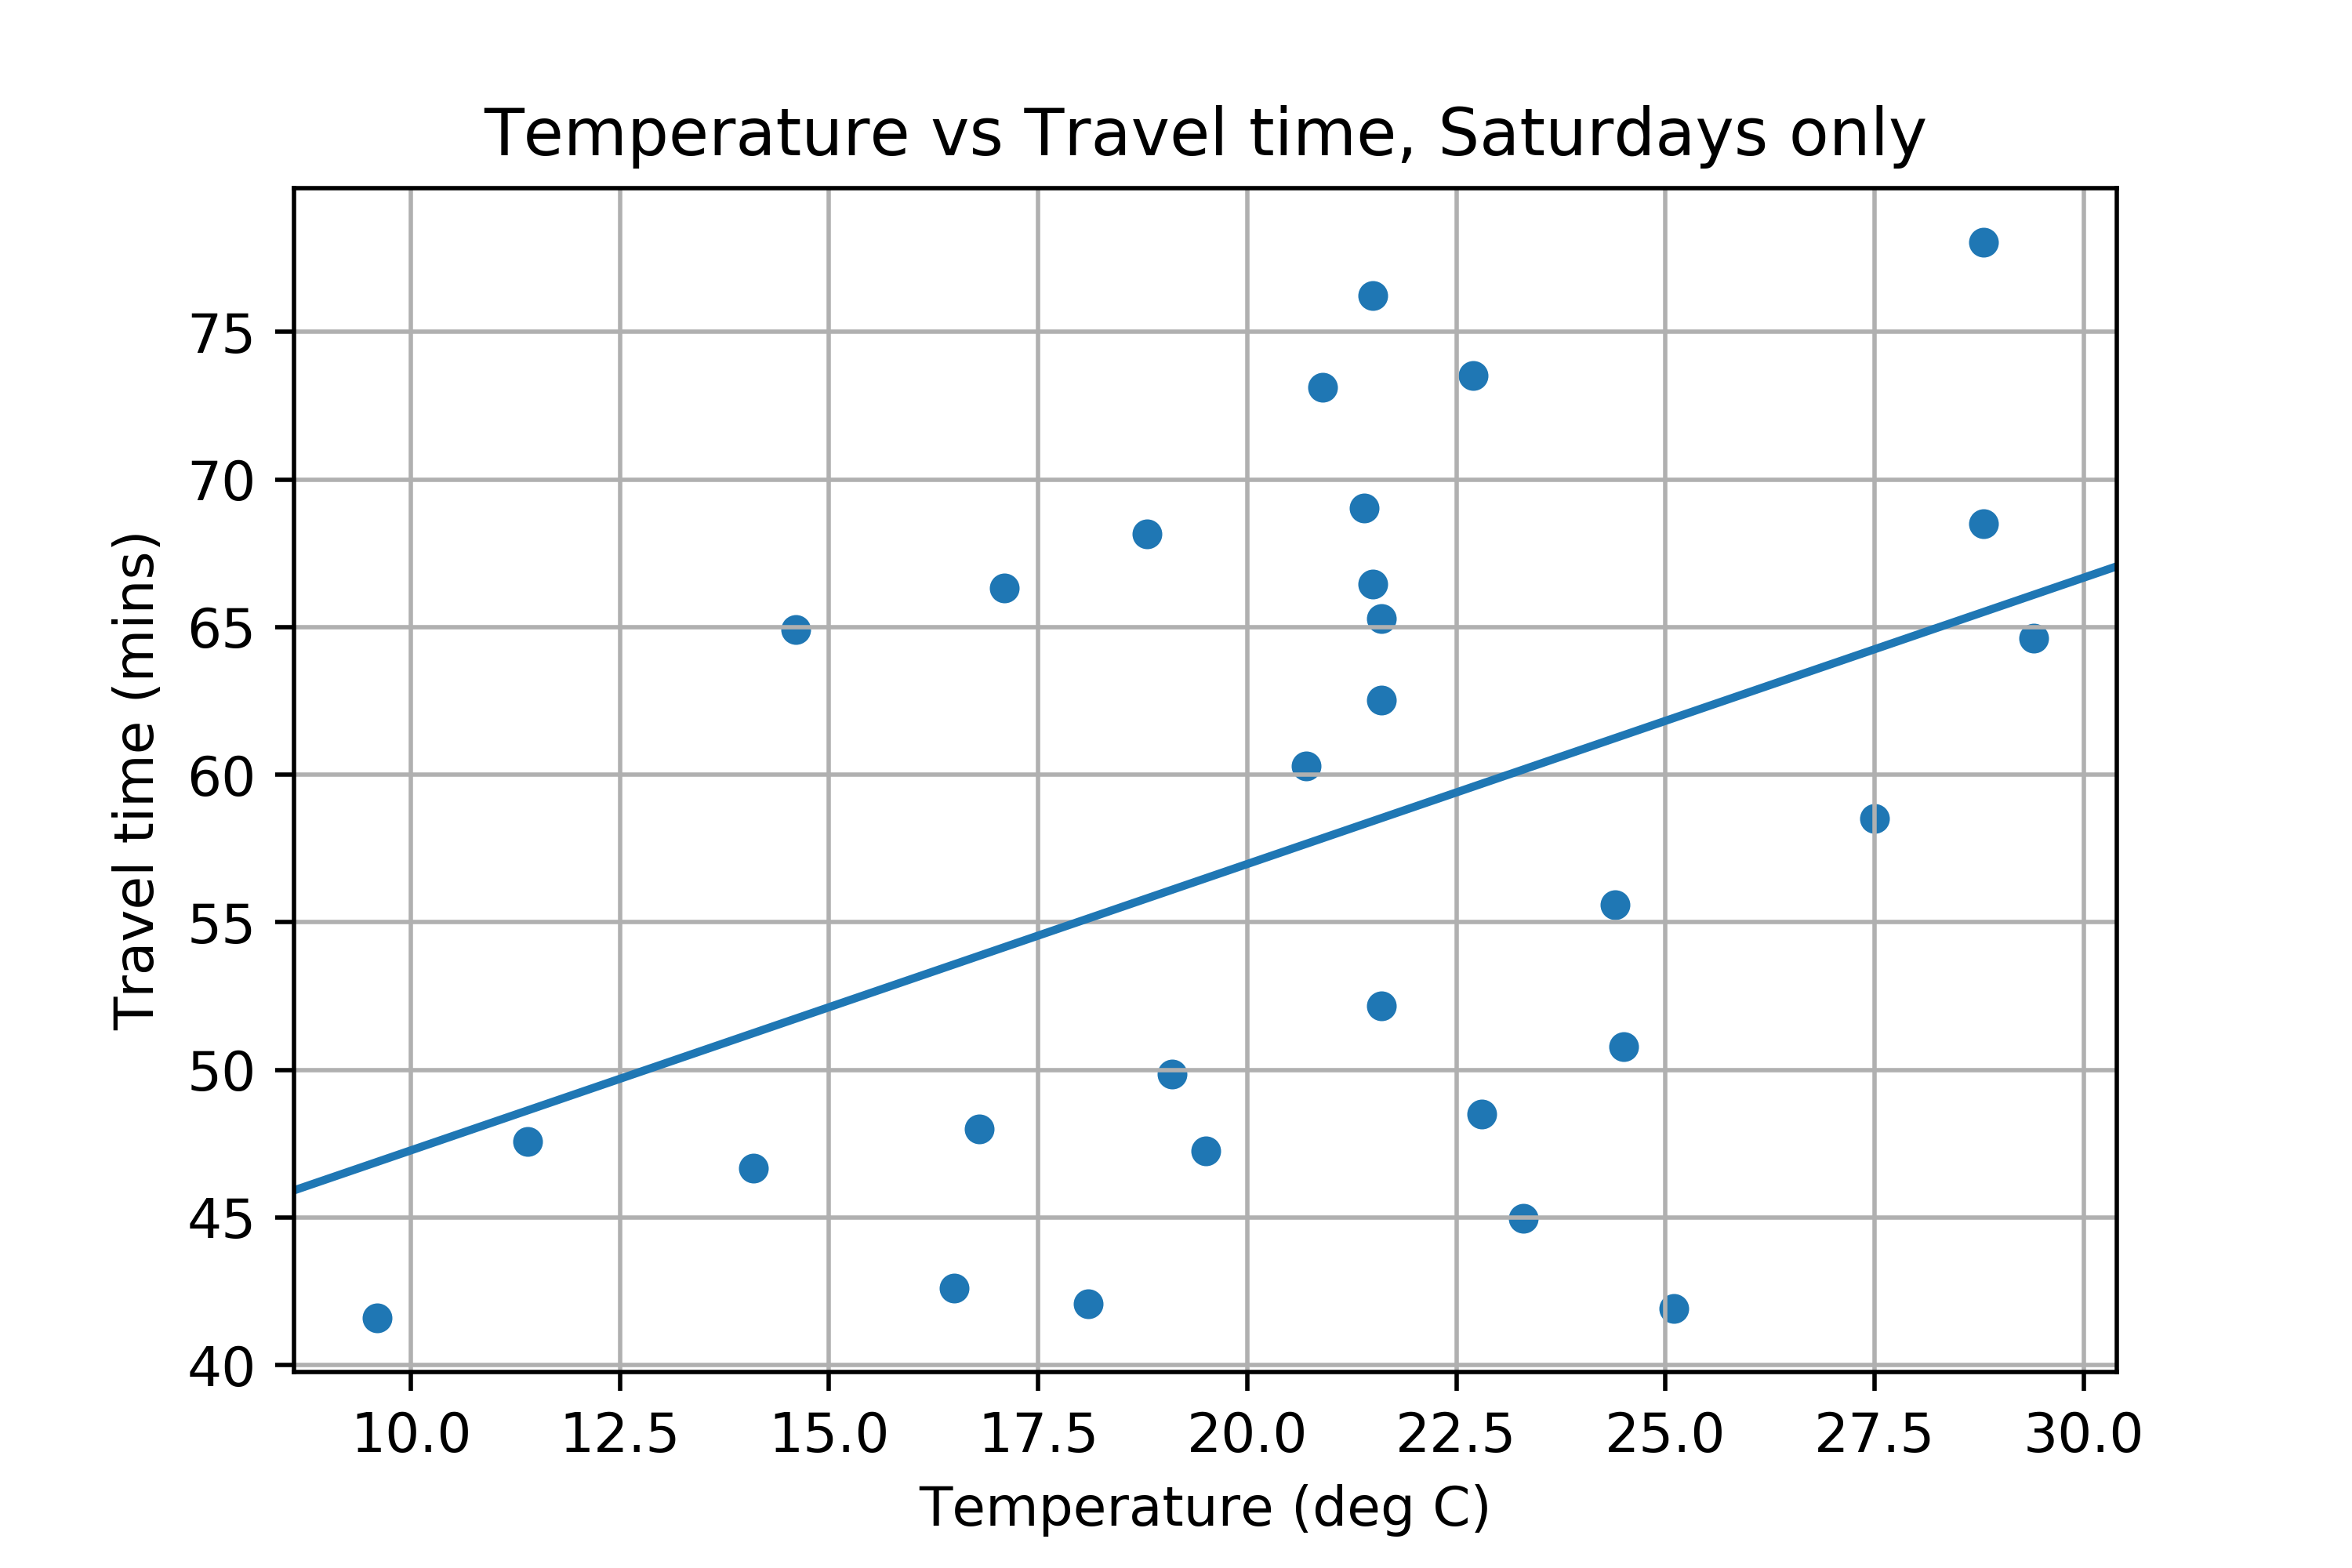
Just for amusement purposes, I decided to look at the travel time between Southampton and Bournemouth on Fridays, Saturdays and Sundays and compare it to the temperature. I got the temperature data for Bournemouth from the Weather Underground API (which doesn’t seem to work any more, as I found when I tried to re-run this analysis). Plotting temperature against travel time gives this graph:
The straight line fit doesn’t look great, but apparently it has a R^2 of 0.67!
The Avenue in Southampton
Finally, let’s look at The Avenue in Southampton. This is a long, straight road running north-south from the end of the M3 at the north of Southampton, right down to the city centre in the south. It gets fairly busy during rush hour, so I thought I’d look at travel time along it. Here’s the graph:
Firstly, you can see that it is quicker to travel southbound on the Avenue than it is to travel northbound. I think this is due to the way that traffic lights and junctions wait: there are various right turns when travelling northbound that cause traffic to queue, and travelling southbound most junctions are either No Right Turn, or have filter lanes for right turns.
Also, the peak in the morning is offset: travel time peaks earlier for traffic going northbound, and later for traffic going southbound. I assume this is because traffic going northbound is leaving Southampton to go somewhere else, so it is the beginning of their journey, whereas traffic going southbound is arriving in Southampton as their destination. There are some other interesting patterns on this graph that I haven’t quite worked out yet – so I’ll leave you to ponder them.
As you may be aware, I use a wheelchair for anything over very short distances. This can rather limit my ability to enjoy going to the beach, as wheelchairs don’t really work on sand…
There are some ways around this – for example, finding a beach where I can park my wheelchair on the promenade and get down onto the beach easily, and going at high tide I don’t have to walk very far to the sea – but even in these situations I find it tires me out a lot. However, there is a better way…
Some beaches have ‘beach wheelchairs’ that you can borrow. They have big inflatable tyres so they don’t sink into the sand, they’re waterproof, and they even float! Here is an example photo of me using a beach wheelchair:
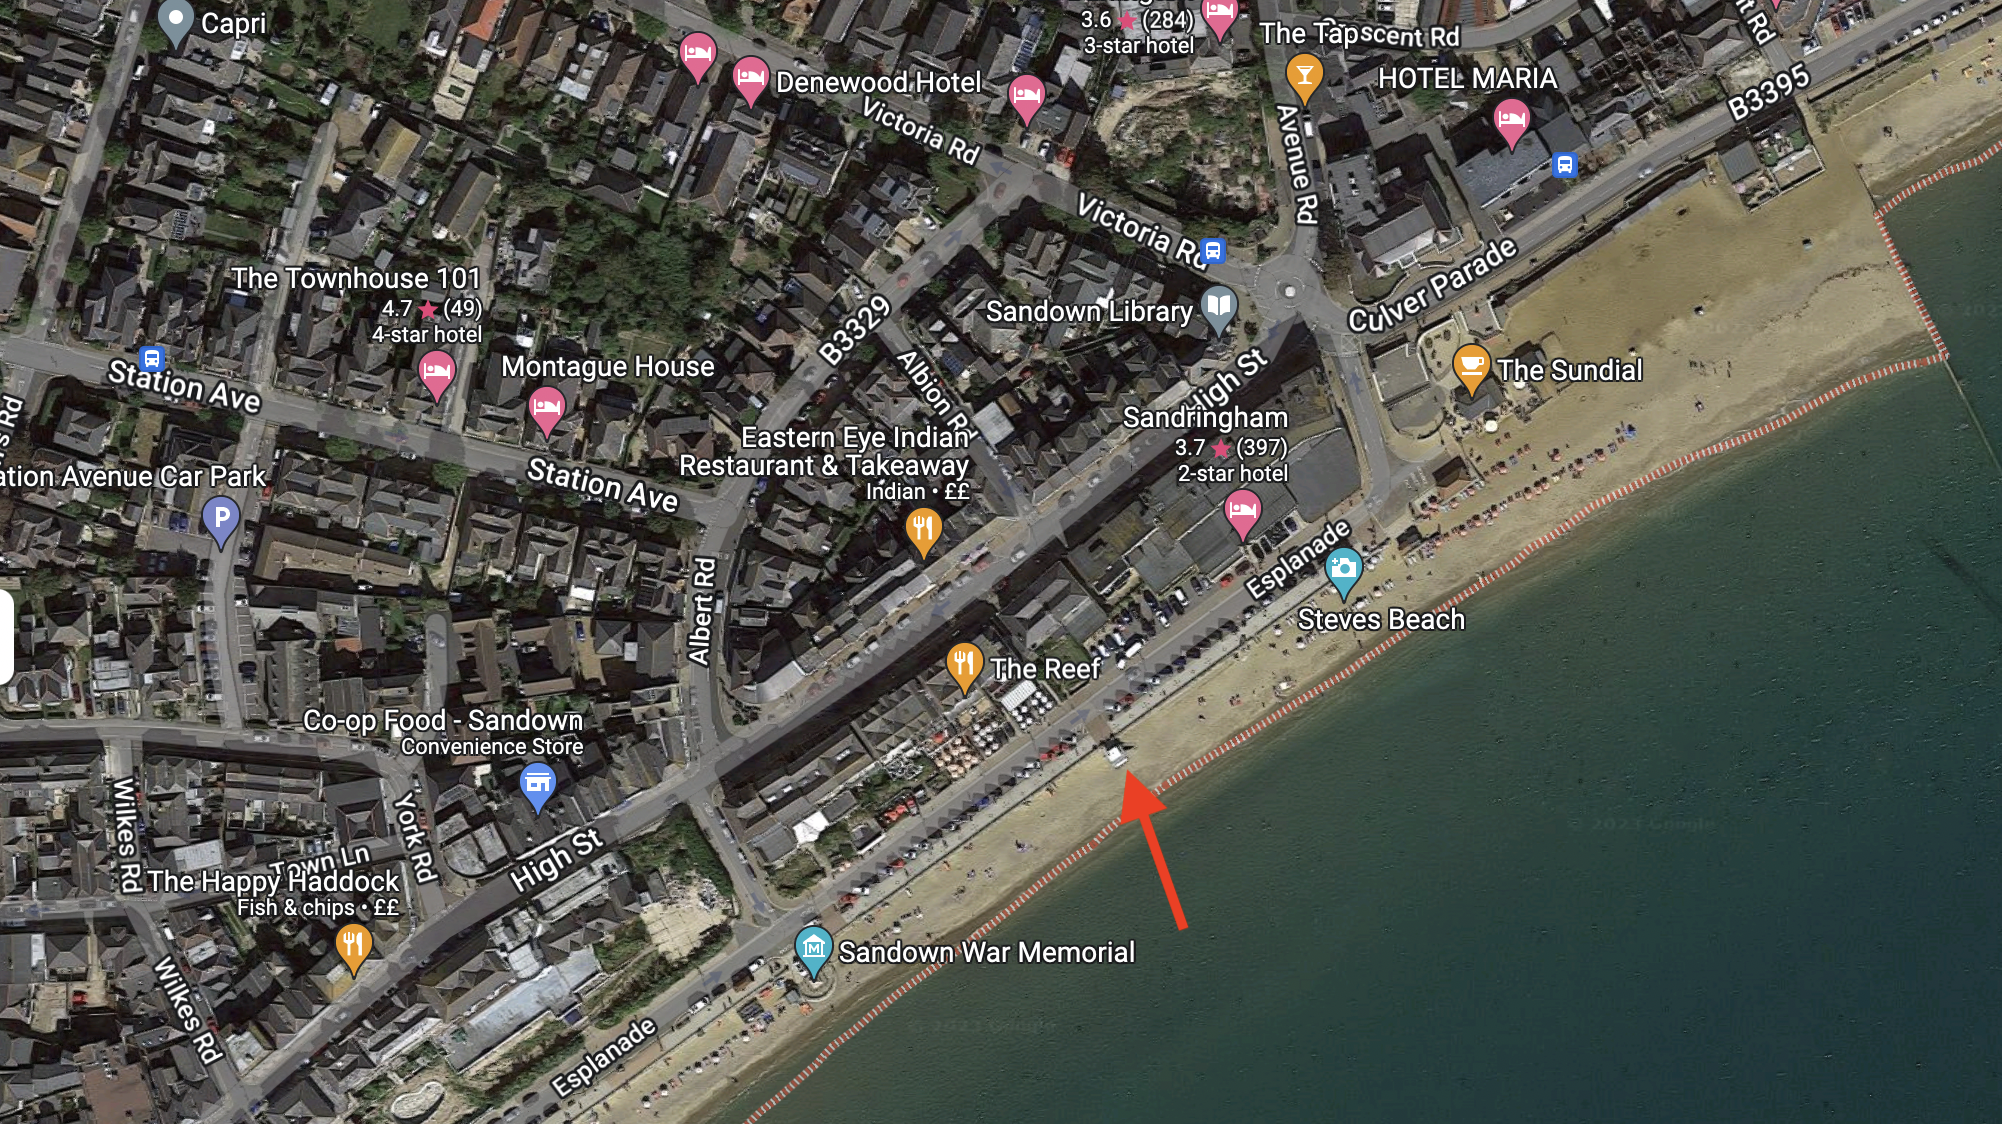
Various beaches around the country have these wheelchairs available to borrow, but it’s quite difficult to find out where they are and how to get access to them. This blog will explain how to find and access the beach wheelchairs in Sandown, Isle of Wight and Barry, South Wales.
Sandown, Isle of Wight
Sandown has a lovely sandy beach on the south-eastern coast of the Isle of Wight. They have two beach wheelchairs, and they are available from the lifeguards in the middle of the section of the beach to the north-east of the pier. They are only available when the lifeguards are on duty (certain hours during the summer months). Go to the lifeguard station, which is an elevated platform at the top of the beach, marked on the map below (click to enlarge) and linked on Google Maps here, and ask for the wheelchairs. It may take them a while to find the relevant keys and get cover for lifeguarding so they can go to their storage room, but they should then come back with the life guard. One of the Sandown wheelchairs is shown in the photo above.
Other tips: there is parking along the road that runs at the top of the beach, free for Blue Badge holders, and there is a nice ice cream shop just opposite the parking bays.
Barry, South Wales
Barry also has a lovely sandy beach, in a bay in the area called Barry Island, just to the west of Cardiff. They have at least four beach wheelchairs, possibly more. They are stored in a room off the Changing Places toilet at the top of the beach, near the funfair.
To find them, go to the toilets behind Marco’s Cafe (see arrow on the map below – click to enlarge), or this location on Google Maps. You can get to the toilets by going either to the left or right of Marco’s cafe, and then around the back. You will find a circular building with standard disabled toilets in it, as well as steps up to normal male/female toilets. Behind the circular building is a rectangular building with a ramp up to one of the doors. This is where the Changing Places toilet (with a hoist etc) is located. Have a look around for a toilet attendant – they will often be in a little store-room at the back of the circular building, or they may be in one of the other toilets, or hanging around the general area. If you ask them for the beach wheelchairs they will open up the Changing Places toilet and then unlock a separate room inside. The beach wheelchairs will be there, and you should also be able to leave your normal wheelchair there to collect later.
I don’t know whether the wheelchairs here are available all the time, or just in the summer season (a lot of things in Barry close down for the winter).
Other tips: There is free Blue Badge parking on some of the roads nearby, particularly the parking bays off Friar’s Rd. Zio’s Gelateria is nice, and Boofy’s Fish and Chip shop does gluten-free.
I came across Karabiner Elements a number of years ago when trying to find a way to get easy access to the # symbol on my MacBook Pro keyboard. I’m not sure why, but it seems that using a UK keyboard layout on a MBP means that to get # you have to press some weird two-key combination – and I could never remember it. As I program in Python, being able to easily use # is fairly important!
So, I managed to get this set up in Karabiner Elements – but a couple of years ago I came across a better way to configure it, which enabled me to easily create a load of extra keyboard shortcuts.
A lot of this post is really just reminding me how I did this – but hopefully it’ll be useful to other people.
The key tool here is Goku which lets you write simple short configuration files which are translated into a complicated Karabiner Elements configuration file.
To get going, install Karabiner Elements and then follow these instructions to install Goku, and set up Karabiner Elements properly.
Then you’ll need to write your Goku configuration file, which you should place in ~/.config/karabiner.edn. Mine is below, and I’ll try and take you through it (I am not an expert at Goku configuration though!).
Let’s start from the bottom: the penultimate rule (starting with :des) remaps the non-US-backslash key (which is the top left key directly below Escape on my MBP keyboard) to the key press Option-3, which is what gets the # symbol on my keyboard (I always have to look that up…).
The final rule is for my Logitech Wireless presenter remote, which connects via a USB dongle and acts as a keyboard. Unfortunately, when pressing the laser pointer button, it sends some sort of key press as well – and that seems to stop videos playing when presenting a Powerpoint presentation. Very inconvenient when you want to use the laser pointer to point out something in a video! So, this rule just remaps that keypress (apparently the ‘dictation’ button) to an unused key combination. In this case, that is !!P which is Cmd-Ctrl-Option-Shift-P – a key combination which is rather unlikely to already be used…! (There is documentation on what these codes like !! means here).
The rest of the rules set up a Caps Lock mode which means Caps Lock can be used normally if you just tap it by itself, but can also be used as a modifier key to allow it to be used with other keys to trigger shortcuts. This works quite well because Caps Lock is on the ‘home row’ so is easy to press with other keys. Most of these remappings just map Caps Lock plus another key to !!<key> – which, as mentioned above, is Cmd-Ctrl-Option-Shift plus the key. This may not seem very useful, but these you can then use this new complicated (but easy to press) key combination as a user-defined shortcut for various things.
For example, I use Alfred, and it has a clipboard history/snippet tool. I’ve assigned that to Caps Lock-T, so pressing that will bring up the tool. This new shortcut won’t conflict with any others (like Ctrl-T or Cmd-T) because nothing by default uses all the modifiers at once.
Another shortcut I use often is Caps Lock-Y to add the selected files to Yoink – this is just configured in the standard Mac Keyboard Shortcuts settings, as Yoink adds a configurable option there under the Finder category.
Most of the rules just map a key to !!<key> but a few do other things. You can run command-line tools directly from Goku/Karabiner Elements, so a Caps Lock-B is remapped to run a small AppleScript that switches to Chrome, and Caps Lock-C is remapped to a small AppleScript that opens the selected file in VS Code. Finally, Caps Lock-E is remapped to a little macro that types x and then deletes the character in front of the cursor, moves left and moves down. This was a useful shortcut for filling in long lists of Github-Flavoured Markdown todo lists, which were often used for PR checklists in a previous job.
So, that’s how I use Goku and Karabiner Elements to get useful keyboard shortcuts – I hope this has been helpful. Just remember that once you’ve edited your karabiner.edn file, you need to either run goku or have it already running as a service – otherwise you’ll wonder why your modifications didn’t work.
Note: I’m trying to get back into blogging, after a very busy time at work in the last couple of years meaning that I haven’t had much time. Hopefully this will be the first of some more regular posts.
Last week I released version 1.9.0 of Py6S – my Python interface to the 6S radiative transfer model.
It’s been the first non-bugfix release for quite a while (mainly because I’ve been busy with paid work), and so I just wanted to highlight a few aspects of the release.
The full release notes are available here, and they include a couple of minor breaking changes (with very specific exceptions being raised if you run into them). Specifically, the pysolar dependency has been updated to the latest version (old versions are not supported as the pysolar API changed significantly between versions), and ambiguous dates in Geometry.from_time_and_location has been dealt with by requiring date-times to be passed in ISO 8601 format. We also no longer require the matplotlib dependency, which makes Py6S a lot easier (and quicker) to install if graphical output is not required.
Code cleanup
More importantly, from my perspective, the Py6S code has had a significant clean-up. The code was relatively high-quality in terms of its operation, but it wasn’t formatted very well, and didn’t use various Python best practices. My excuse for this is that it was first written a long time ago, and I haven’t had time to update it…until now!
As part of this release, I ran the black formatter on the code-base, and used isort to sort the imports. I then added a pre-commit configuration to run black and isort every time I commit. The following is the contents of my .pre-commit-config.yaml file:
repos:
  - repo: https://github.com/python/black
    rev: 20.8b1
    hooks:
      - id: black
        language_version: python3.7
  - repo: https://github.com/asottile/seed-isort-config
    rev: v2.2.0
    hooks:
    -   id: seed-isort-config
  - repo: https://github.com/timothycrosley/isort
    rev: 5.5.2  # pick the isort version you'd like to use from https://github.com/timothycrosley/isort/releases
    hooks:
    -   id: isort
This will run black and isort on every commit, and also includes an isort ‘seed’ step that seeds a list of third-party modules that are used, which isort uses internally for some of its operations.
When writing Py6S I’d used a lot of * imports – like from Py6S import *. This is not best practice (and wasn’t even best practice when I wrote it!) and so I wanted to remove these – and I found a handy tool to do this: removestar. Simply run this on your source files, and it automatically replaces * imports with imports of the actual objects that you use from that module.
I also went through and fixed all flake8 errors across the whole project.
M1 support for 6S
Another recent change has been the addition of support for running the underlying 6S model on the Apple M1 processor (sometimes referred to as osx-arm64). I was expecting Apple to announce new MacBook Pros with M1 (or similar) processors at WWDC last week – so wanted to make sure that I could run 6S on a new machine (as I was intending to purchase one). Unfortunately, these laptops weren’t announced – but it’s good to get this working for other people anyway.
The recommended way to install Py6S involves installing 6S using conda, with the package hosted on conda-forge – and conveniently conda-forge provide instructions for setting up M1 builds for conda-forge projects. Building 6S on the M1 is a little difficult, as there is no Fortran compiler available for the M1’s at the moment – so a complex cross-compilation step is required.
I’m glad to say that the instructions provided by conda-forge worked really easily. As 6S is not a Python package, I could ignore the long list of additional build dependencies to add, and simply had to add
to the conda-forge.yml file and then make sure that ${CMAKE_ARGS} was used in the call to cmake in build.sh. You can see the full PR for these changes here (there are lots of changes to other files caused by ‘re-rendering’ the feedstock to use the latest conda-forge configurations).
As I don’t have a M1 Mac yet, I can’t test it directly – but I am assured by a correspondent on Twitter that it works – hooray!
I’m glad I had chance to do some of these changes to Py6S, and hopefully I will have chance to update it more often in the future.